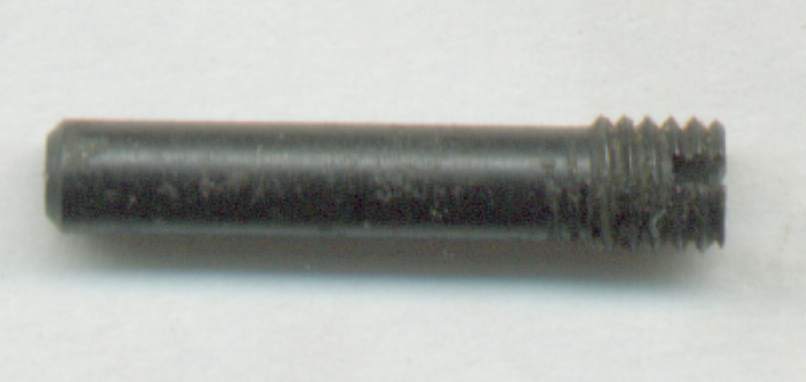
The folding stock has a piece of rubber that acts as a shock absorber, part #83. These rubber versions dry out and break up on a regular basis.
Introduction
There seem to be a few common repairs required with a SPAS12 over time -- here are a few.
They just about all involve plastic parts (surprised?). Oh, I'm sorry! That's "Polymer" parts, not plastic. It's cheap plastic in most consumer goods, but it's Polymer when used on a gun. My error. Wouldn't want to tell some pistol owners they have plastic guns! :-)
PlasticAnyway. :-) To see the parts referred to by number in these repairs, see the Exploded Parts Diagrams here.
1 : a plastic substance; specifically : any of numerous organic synthetic
or processed materials that are mostly thermoplastic or thermosetting
polymers of high molecular weight and that can be made into objects,
films, or filaments
For a disassembly procedure, look here.
Here are the common repairs:
Folding Stock Shock
Absorber
Receiver Shock Absorber
Magazine Cutoff Spring
Folding Stock Bumper
Clogged Gas Ports
Bolt Locked Shut
Folding
Stock Shock Absorber
The folding stock has a piece of rubber
that acts as a shock absorber, part #83. These rubber
versions
dry out and break up on a regular basis.
Franchi made them of different materials over time. The first were a black molded rubber. They all failed or will shortly. Then they were machined out of a clear, softer material. No record of one of these failing -- yet.
Can I use the gun without it? Yes, will just be more painful and it will damage the metal over time..
The factory parts are no longer available for purchase. I have started selling an improved version in the store. They are carefully designed to work better and last much longer.
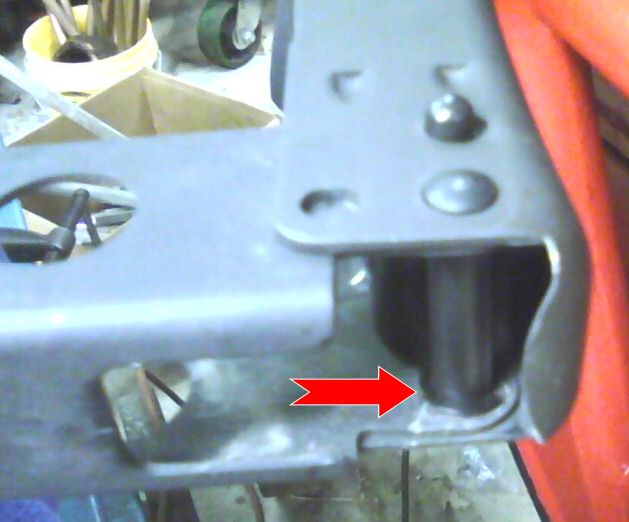
Fold the end of the stock. You will
see the two c-rings (#78) on the pivot shaft (#77).
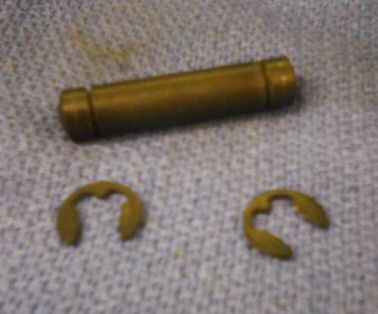
Pull off both c-rings and pull out the
shaft. The very end of the stock will come loose.
Finally, depress the button on the
latching
pin and pull it out along with any shock absorber that might still be
on
it. You may have to pry the metal a bit wider.
To reassemble:
DOES
YOUR SPAS (or LAW) HAVE A RECEIVER SHOCK ABSORBER???
Or are you breaking
up your receiver with every shot? If you have an empty hole then
you are over-stressing the poor Aluminum receiver with each shot,
creating
and expanding tiny stress fracture cracks that will someday meet up and
make your receiver a two-piece.
"Then this round metal piece came out near the bolt carrier? Then all these plastic pieces started falling out?" The shock absorber failed and fell out.
How can you tell? You have to look. Like high blood pressure, there are no symptoms till the SPAS dies. You must look. Push out the two pins that hold in the trigger group, pull out the group. You should be able to get directly at it -- or the hole whewre one was.
You think your SPAS probably has one? Unless you or someone has put a new one in, it's likely long gone. Even the fresh out of the box guns are breaking them on the first few shots -- the plastic has become hard and brittle with age.
The parts are available -- no reason to ruin your gun.
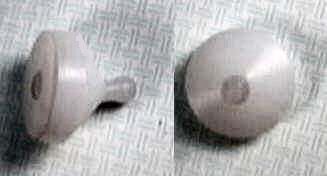
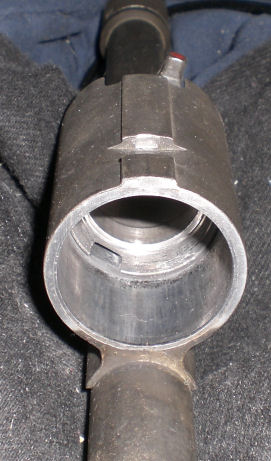
"Old" Style Shock
and Receiver -- note the "cone" shaped empty hole in the receiver.

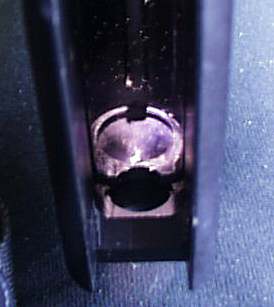
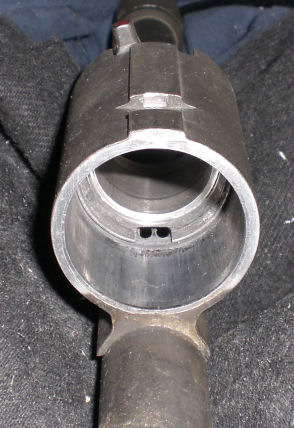
"New"
Style
(Above)
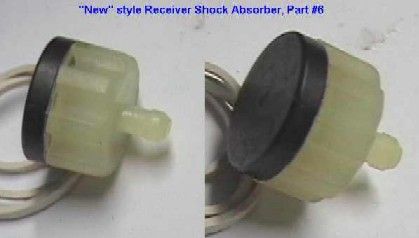
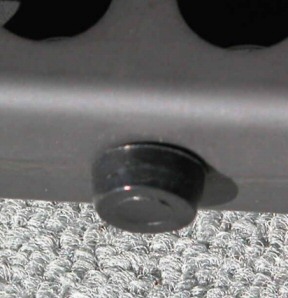
New Style installed, this one has a "belly button"
This is part #6, and is not easy to see on the parts diagram. It snaps into a recess in the receiver ( #1). It goes into a recess inside the back of the receiver, just above the big hole the big stock-mounting bolt (#63) screws into. The white turns brown with age.
Often they don't fail as an absorber, the little tit that sticks out the back and retains them breaks off.
To replace it, see the Replacement Procedure for the replacement style. No more point in talking about the original parts.
There are two styles, as shown above -- make sure you get the right one! The old goes into a cone-shaped hole, the new into a cylinder shaped hole. Some other pictures that may help are here. The new style has a metal plate on the end -- the old style does not. You can check this with a magnet to see what you have.
Can I shoot the gun without it? In pump mode, OK. In semi-auto mode you can for a while, till you break the receiver.
I have made a up both styles in a much better material, and that secure with a screw. Details are here.
SAS Owners
Does the SAS12 have one of these, need one of these? I used to think so. But there is mounting evidence that Franchi was too cheap to put one in the SAS since it is pump-only.
Can it take one, yes, the receiver is identical to the SPAS12 and LAW12. Having one will stop a metal on metal whack when you pump the gun. Is it necessary -- apparently no. Did I put one in Dave's and my SAS? Yes. They work great.
For some reason a lot of these guns seem to lose the spring (#16) from the Magazine Cutoff. It's a simple problem to fix, just remove the screw, put the spring in, put the screw back in. See this step.
One note (added 5/2001) -- be careful taking out that pin (#17). Here is a picture of a new one, you can click it for a larger view if you want to:
Note the slot in the end is a simple,
straight slot. Like in all gunsmithing, you must get a
screwdriver
that fits it exactly. The real danger here is if you
force
a normal tapered screwdriver into it, you will spread the head and lock
it into place for all time. It will then need to be drilled out
or
EDM'ed. Be careful!
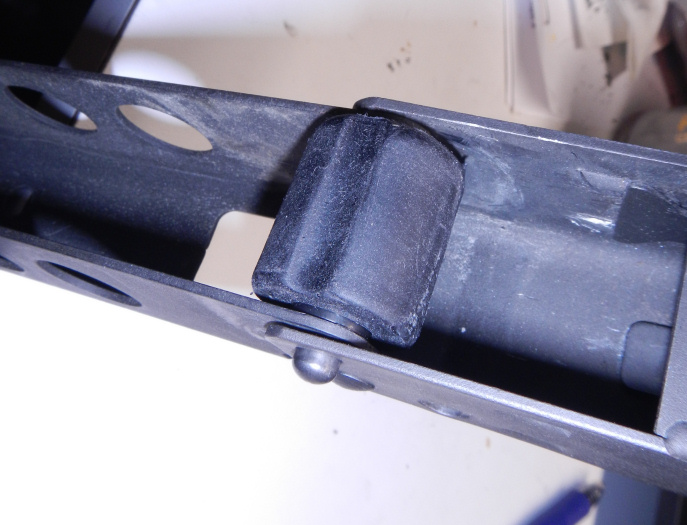
This only applies to some guns with folding stocks, mainly the SAS and LAW. But I have seen it on some SPAS's, mainly folders that don't latch to the rear sight.
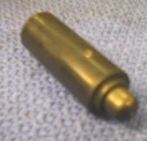
Being rubber, the part will deteriorate and crumble away. Note this part is not shown on the part diagrams or lists.
Bill G. was kind enough to send me images:
I have found a replacement bumper, see
my
parts.
A lot of people write and say their gun won't cycle in Auto, even with magnum buckshot loads. Many times the action will open but not extract. This is just it opening from recoil and blowback, the gas system is not working.
It might be a missing O-ring, but they will tend to cycle with a heavy load without an O-ring.
The cam plate inside the foregrip that moves the gas valve might be broken, but never seen it.
Likely the gas ports are plugged.
There is a tab sticking out that is
moved
by the cam inside the foregrip. When you slide the foregrip back
and forth between Manual and Auto, a cam inside moves this tab and
opens
and closes the gas valve.
Here it is closed, as it would be in
manual
mode. Note the tab position.
Here it is opened, as it would be in auto
mode. Note the tab position.
Note the two gas port holes!! The are drilled at an angle, you are looking straight down them here.
These being plugged are the cause of most gas problems.
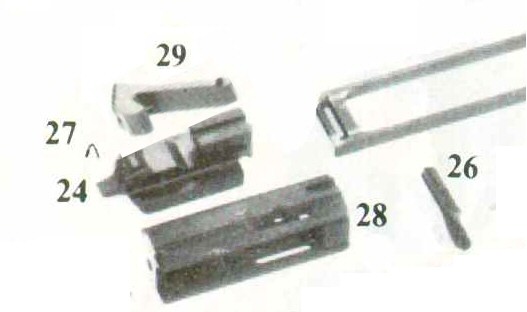
Sometimes the bolt on a SPAS won't unlock, won't open. One way to open it is to hammer it open. The bolt you see below was hammered open, you can see the results. That is steel -- you should see the Aluminum receiver! Two people have asked about this and one guy ruined the gun with the hammer, so let me give just a few words.
No, I can't tell you why it is jammed, but I can show you how it works. It's very simple once you see it working.
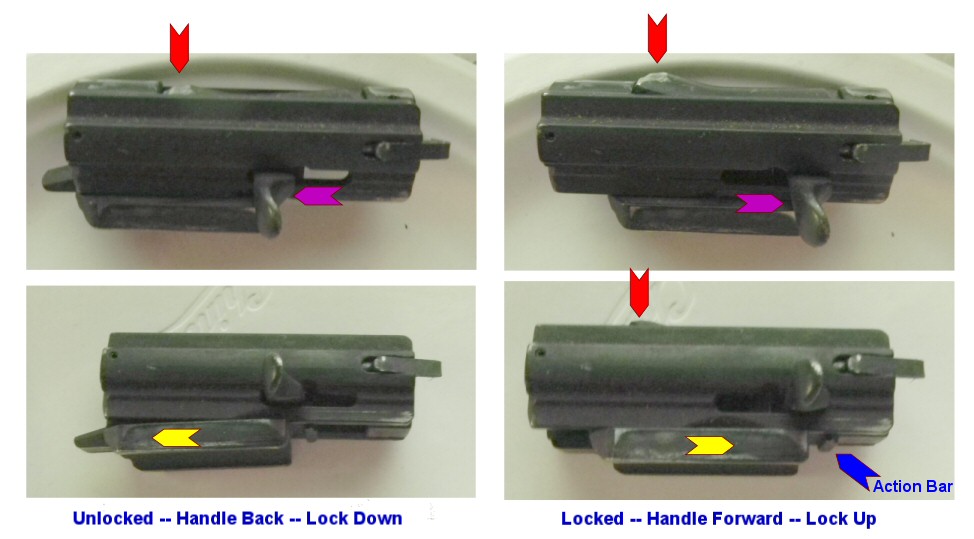
The bolt on the left is unlocked. The bottom part (24, yellow arrow) is back, along with the handle (26, purple). The lock on top (29, red arrow) is down, allowing the bolt to come back.
The bolt on the right is locked. The bottom part (24, yellow arrow) is forward, along with the handle (26, purple). The lock on top (29, red arrow) is up, locking the bolt to the receiver.
There is no gravity involved with the lock (29), it is pushed out and pulled back by the lower part (24) moving.
Two things move this bottom part (24). The lever (26) will move it if the action bar which attaches to it (blue arrow) lets it move. It can also be moved by the action bar itself.
So task one is to get part (24) back. This should release the bolt.